Showing posts with label Art. Show all posts

Tuesday, July 31, 2012

Days 29-30: Finger Painting & a 2nd Scavenger Hunt


We're in the final stretch of "31 Days of Play." Technically, the challenge ends today, July 31st, but we missed a day of "play" on Sunday, so I'm making up for it with one final activity tomorrow, August 1st.

On Monday I made some homemade finger paints using a recipe that I've used before. They are very easy to make, and you probably have all of the ingredients on hand.


Recipe: Homemade Finger Paints


1/2 cup cornstarch
3 T sugar
1/2 t salt
2 cups water
Food coloring

Combine all four ingredients in a small pot. Stir on medium low until mixture warms and thickens. It should be pretty thick. Remove from heat and cool. Pour into containers and mix in food coloring.

I taped down some Kraft paper to our kitchen table, distributed bowls of finger paints, and let the girls dig in and paint. Of course, I painted, too. Actually, I think I enjoyed finger painting more than they did! There's something incredibly relaxing in smearing globular paints with your fingers.

Cora thought the paints were a little too icky for her liking.


Kate painted with them the longest; however, that was only 15 minutes. I think both girls really struggled with what to do with the paints because you can't actually draw anything with them. You more or less spread them around with your fingers and make a big mess, which I thought was totally fun; them, not so much.


All in all, I think finger painting would be a good quiet time activity for my girls because, at 8:00 in the morning, they were both more interested in running around outside than painting. But I will definitely do this art project again.


Today, we had another outdoor scavenger hunt. This time, instead of taking photos of natural objects in our yard for the kids to search for, I made a list of items for them to find.

Scavenger Hunt List
  • A yellow leaf
  • An ant
  • A purple flower
  • Something rough
  • A stick to use as a magic wand
  • A bird
  • A dry patch of grass
  • Something smooth
  • A pine cone
  • A really big rock
  • Something unique that catches your eye
 One yellow leaf


 A purple flower

 Something rough


A stick to use as a magic wand
 
 Something unique that catches your eye--clumps of mowed grass :)


Blessings to you,
 
Keri

For comments or questions, contact me at: growinginhisglory@gmail.com

Find Growing in His Glory on Facebook.

I would love to see more of you!  If you are encouraged by what you read here and would like to have posts from Growing in His Glory delivered to your inbox daily, simply click here.  Or you can subscribe in a reader of your choice in the right sidebar.
 
This post may be linked to:

Thursday, July 26, 2012

Day 26: Fizzing Sidewalk Paint


We're in the final stretch of our "31 Days of Play" challenge. To see what we've been doing, go here.

This morning, before the heat was too unbearable, I whipped up, yes, some more paints. We're definitely on a painting kick this week with bubble paints and nature painting, but it's just so fun!  Fizzing Sidewalk Paints are awesome because you not only get to paint, but you also get to make your paintings fizz. It's a science experiment, art, and play all in one!

Here's what you'll need:

  • 1 small box baking soda
  • 1/2 cup cornstarch
  • Food coloring
  • Warm (almost hot) water
  • Squirt bottle filled with vinegar
Mix the dry ingredients first. Then add a few drops of your desired color of food coloring. Add warm water and stir. You want the paint to be thick enough to paint with but not too thick that you can't maneuver a paint brush in it. If you don't use the paint immediately, you will need to stir it up right before you use it.

I divided the baking soda-cornstarch mixture into 4 bowls, so we could make 4 different colors of paints.


Then, we headed outside and painted our hearts out.
 

 But the best part was spraying the paints with vinegar and watching them FIZZ!!!


My little Smurf loved pouring the paints into her pink cup and then back into the paint container. She's just a messy little thing.


Fizzing Sidewalk Paints were so fun! I hope you will try them out and let me know what you think!

Blessings to you!

 
Keri

For comments or questions, contact me at: growinginhisglory@gmail.com

Find Growing in His Glory on Facebook.

I would love to see more of you!  If you are encouraged by what you read here and would like to have posts from Growing in His Glory delivered to your inbox daily, simply click here.  Or you can subscribe in a reader of your choice in the right sidebar.


This post may be linked to:

Wednesday, July 25, 2012

Day 25: Nature Painting


We are on Day 25 of the "31 Days of Play!" Challenge. To find out what we've been doing, click here.

Today I wanted to get out the paints and head outside before the triple digits forced us to stay in. I found this idea for painting cards with dandelions at Simple Kids and thought it looked like something the kids and I could do together. However, instead of searching only for dandelions, we went on a little nature walk in our yard and picked up neat objects that we thought would be fun either to paint on or paint with. 

We collected a variety of rocks, Queen Anne's Lace, ferns, leaves, rosemary, tree bark, and dandelions of course.

 
 I set out different color washable tempera paints for the girls to choose from.


Then, each girl had a piece of watercolor paper that I taped to the tablecloth for them to paint on. Kate chose to paint her rocks instead.


While Cora just threw paint all over her paper.


I tried to show them how to use the nature objects as paintbrushes. Here I used a dandelion head to make rows of different colors.


 But they weren't too interested in that. Kate really just liked painting her rocks.


In any activity we do--whether school-related, arts & crafts, or play--I try to allow the kids freedom of expression and independence. I don't want to constrain them by saying "this is the way to do it" when they are having fun doing it "their way."

My goals for this craft were (1) to spend time together, (2) to explore nature, and (3) to create something with the natural objects we found. I believe we accomplished all three!

Here are our nature paintings:


Pretty cool, huh?

In what ways have you found to incorporate nature into arts & crafts with your kids? 


Keri
 
For comments or questions, contact me at: growinginhisglory@gmail.com

Find Growing in His Glory on Facebook.

I would love to see more of you!  If you are encouraged by what you read here and would like to have posts from Growing in His Glory delivered to your inbox daily, simply click here.  Or you can subscribe in a reader of your choice in the right sidebar.


This post may be linked to:

Tuesday, July 24, 2012

Days 22-24: Blocks, Frogs, & Bubble Paints


We are on Day 24 of the "31 Days of Play" challenge. If you are just joining us, my aim is to spend quality play time with my kids every day. Some days we simply play with the children's toys while other days I have a craft or outdoor activity to do together.

Cora and I had some fun playing with blocks while Kate was visiting with her grandparents. We built tall TALL towers and then knocked them down over and over again. Cora has a knack for putting things together and taking them apart, so we spent a fair amount of time building together.


 Our little engineer

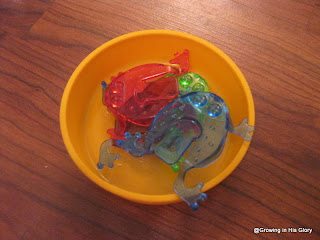
Kate brought home a really fun game that a dear friend gave her. You might remember this game although I can't think of the name of it. Basically, you push down on the frog's back and it hops. The objective is to jump all your frogs into the bowl. It's a great game to help preschoolers work on fine motor skills. Cora was a little too young to play this one, but she did like to sort them by color.
 

We also did a fun craft that I found online: bubble paints. Super simple but not really a craft for little ones. Kate (3 1/2) lost interest fairly quickly, and Cora (21 months) couldn't blow bubbles very well. Instead, she ended up with Dracula-like lips. I think this would be a good art project for slightly older kids though.

What You'll Need:
  • Bubble solution
  • Dish detergent (to make it more bubbly)
  • Food coloring 
  • Bowls
  • Watercolor paper or card stock


What You Do:
  1. Pour bubble solution and dish soap into bowls. 
  2. Add food coloring & stir together.
  3. Using bubble wands, blow colored bubbles onto paper. {I taped paper down to keep it from moving.}


 Yes, she's in her diaper. But be careful because food coloring may dye your clothes.

Our Bubble Paint Masterpieces


I will definitely keep this project in my arsenal of "Crafts to Do Again" because I think they turned out pretty neat.

What are your favorite crafts to do with toddlers and preschoolers?

Blessings to you,


Keri
 
For comments or questions, contact me at: growinginhisglory@gmail.com

Find Growing in His Glory on Facebook.

I would love to see more of you!  If you are encouraged by what you read here and would like to have posts from Growing in His Glory delivered to your inbox daily, simply click here.  Or you can subscribe in a reader of your choice in the right sidebar.
 

This post may be linked to:


Friday, July 13, 2012

Day 13: Moon Sand


{Curious about what we're doing? Check out our prior "31 Days of Play" posts.}

Have you ever heard of moon sand? You can buy it at Target or Wal-Mart, but I never have although I've been curious. So, when I saw this recipe for moon sand, I thought it looked easy enough that we'd give it a try. I bought a 32 oz. bag of sand at JoAnn's for $1.50 after a 50% off coupon, and the rest of the ingredients I had on hand.

Moon Sand

What You Need

2 cups colored sand {I colored mine with food coloring; beware: it does dye your skin temporarily}
1 cup corn starch
1/2 cup water

Mix ingredients together.

----------------------------------------------------------------------------------------------

Let's just say, when you make moon sand {or at least this recipe for it--apparently, there are several different ones out there}, you have to follow the amounts exactly. No guessing or approximating, people.

Otherwise you get this...

A big blue monster-baby with chocolate-chip face

Cora didn't know what to think of the moon sand. She immediately started slathering it on her arms like it was lotion or something. Kate and I couldn't stop laughing.

Notice the little muffin in her right hand.

Still holding that muffin

Contemplating taking a bite of said muffin but Mama intervened

Still, the moon sand has a nice texture, much like sand at the beach. It probably would have been more enjoyable had Mama been prepared with some buckets and shovels or at least some small toys to hide in the sand. Alas, we just marveled at how cool it felt in our hands. Then, I realized that the food coloring on the sand was dyeing our skin bluish-green, so we hosed off and ran inside to change clothes.


Inside we found a little friend had camped out in our kitchen sink. Not sure how he got there, but he was hiding under a dish and jumped right up at me when I lifted the dish out of the sink. It scared the living daylights out of me! Kate was afraid he'd eat us up, but I calmed her fears and we released him into the wild. 


It was a fun-filled day of icky blue-green sand and amphibians at the Tidwell house. 

How about you? Did you have fun with your kids today?

Blessings to you,

Keri
For comments or questions, contact me at: growinginhisglory@gmail.com

Find Growing in His Glory on Facebook.

I would love to see more of you!  If you are encouraged by what you read here and would like to have posts from Growing in His Glory delivered to your inbox daily, simply click here.  Or you can subscribe in a reader of your choice in the right sidebar.


This post may be linked to:


Tuesday, July 10, 2012

Day 10: Sparkly {or Silly} Sunglasses


Last week when we were at the Dollar Tree, Kate spied these really cute kid's glasses, so she and her sister picked out a pair. For $1, I couldn't say no.

I guess I've been reading too much Fancy Nancy lately because I had this brilliant idea to spruce them up with some bling. I also pulled out some googly-eyes.

Our fun sunglasses

This is the easiest craft imaginable. Grab your glasses, some good quality craft glue {I used Elmer's Craft Bond Precision Tip Glue}, and your desired frillies and glue away.

 Cora's "I Can See You" Shades


Kate's "Bling-Bling" Spectacles

Unfortunately, the sun started melting the glue {and us}, so we hurried inside and Mama didn't have a chance to decorate her sunglasses. Oh, darn! :)

Here are the girls in their shades. Cora did not want to wear hers for some reason but insisted that baby Annabeth wear them. Neither were too thrilled.

 However, Kate couldn't resist posing in hers like a Foster Grant model.


A fun activity for the summer!  Hope you have had fun with your kids today!

Blessings to you!


Keri
 
For comments or questions, contact me at: growinginhisglory@gmail.com

Find Growing in His Glory on Facebook.

I would love to see more of you!  If you are encouraged by what you read here and would like to have posts from Growing in His Glory delivered to your inbox daily, simply click here.  Or you can subscribe in a reader of your choice in the right sidebar.